The microphone is a device with which we can make a computer recognize our voice, store it or even transmit it to programs to facilitate communication or perform other tasks.
This device is used mainly in programs designed to make calls or video calls , even when you want to log a video or a live broadcast. It has many uses, and most of them oriented to the field especially domestic, although it also has some importance in the professional field, especially when conducting online meetings.
Sometimes problems may appear when using it. For that reason, we will explain how to enable and disable the microphone in Windows 10 . A measure that also protects the privacy of the users and that we detail step by step in this guide, together with solutions for cases in which the system does not detect said microphone. The incidents are very common in this and other operating systems, so we give you the tools to solve them.
Index:
Steps to enable or disable the microphone in Windows 10
The steps to enable or disable the microphone in Windows 10 are few, and simple . Below we list and detail them so you can do it on your own.
1 – Enter the Windows 10 settings panel
First, start the operating system and log in as usual. Once you are on the desktop with your profile, if possible one with administrator or elevated permissions, press the “ Start ” that is on the bottom left.
In the drop-down menu that opens at the moment, go to the left side again and, in the icon column, click on the one in the shape of a gear, it will take you to the “Settings” menu 10 strong> and to the system settings panel.

2 – Open the sound control panel
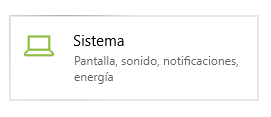
On the screen you are in now, look for the “System” section and click on it (it has a computer-shaped icon).

Now, check out the column on the left side. In that string of available sections, you must click on “Sound” to access its settings. Now look at the right-center part of the window .
You have in front of you several points related to the configuration of both the outputs and the sound inputs, but you must download. Scroll down until you reach “Device preferences and application volume” and click there.

3 – Activate or deactivate the microphone
Within this new window, search for and enter the “Record” tab. You just have to click on it, knowing that it is at the top.
Now, you will see a list of listed devices. Choose the one that corresponds to your microphone , usually has a green circle with a tick, and right click on it. Within the drop-down you’ll see now, you can check the “Disable” or “Activate” option to disable or enable it. In the same way, you can do this with other microphones that you have connected.
Windows 10 does not detect the microphone How do I solve it?
It is possible that, when you connect your microphone, you will see that it does not appear anywhere and that the system does not pick up your voice when you use it. In case it happens to you and you see that Windows 10 does not detect the microphone , we can offer you several solutions to remedy it.
First, check that you are properly connected . If so, check both the cable and any possible switches you may have. In some models a button that silences the microphone and automatically disables it is incorporated. You’ll just have to press it and it will start working.
If what happens is that it is not listed in the devices section, available within the sound control panel that we explained in the previous section. Do this:
- Inside the sound control panel, and the record tab , right-click on free space within this listing.
- Press “Show disabled devices.”
- In case your micro appears now, right click on it and “ Activate”.
It is possible that, despite this, this device remains undetected. In that case, do the following:
- Click on the “Start” button and, in the search bar, type “ Administrator devices ”. Click on the first result later.
- In the window that appears now, go to the “Sound and video controllers and gaming devices” section and click there with the button right. In the drop-down menu, choose the option “ Search for hardware changes ”.
- Now go to the devices deployed by clicking on the section mentioned in the previous point. Find the one that corresponds to your microphone and right-click on it. There, choose now “Update driver”.
- Click now on “Find automatically updated driver software” and let the system work.
>