
Index:
UPDATED ✅ Want to format an external or internal hard drive on your MacOS computer? ⭐ ENTER HERE ⭐ Learn Everything! FROM ZERO! ⭐
A hard drive is a data storage device and is considered one of the most important elements of any computer system. Since, without it, users would not be able to save any type of digital information on their computers.
However, for reasons of cleanliness, security or any other reason, there comes a time when it is essential format the hard drive to start from scratch. This basically means completely erasing the data stored on that piece of hardware.
Because in macOS It is still an unknown procedure for many, we want to emphasize the steps to follow to format an external and internal hard drive in this OS.
When should a hard drive be formatted?
While it is true, format or format a disk It consists of erasing all the data stored in it to start from scratch. Thus, it refers to delete what is on the storage drive, leaving it as you want. Mainly, in the initial configuration or the factory state.
Indeed, the act of formatting or shrinking a hard drive means to clean it in its entirety so you can install anything on it. So, it is a very necessary clean slate to optimize the operation of this element and at the same time, of the computer. However, You will surely wonder in what situations or for what reasons a hard drive should be formatted.
Given this, we highlight the main reasons to format or reduce a hard drive to its initial state:
- For remove root a virus or malware that is affecting the specific computer or storage unit.
- For to improve operating system performance and ensure that installed programs start more efficiently.
- For increase speed up your computer’s startup and avoid hassles waiting for it to turn on.
- For run preventive maintenance of the computer in order to extend its useful life.
- For realize installations from scratch from a storage drive without external programs or files. That is, almost factory.
- To migrate the operating system with greater simplicity, since the hard disk will be empty to make the transition.
Learn how to format an internal or external hard drive on MacOS
Directly from the operating system and without the need to resort to third-party tools, it is not complicated to format a hard disk in macOS. Taking into account that it is possible to do it with both an internal and external storage unit.
Next, we explain how to do it step by step, in each case:
External disk
- To get started, from the Dock, click “Launchpad” which is distinguished by its rocket icon and after obtaining the options of your Mac, go to the group “Others” and click on “Disk Utility”.
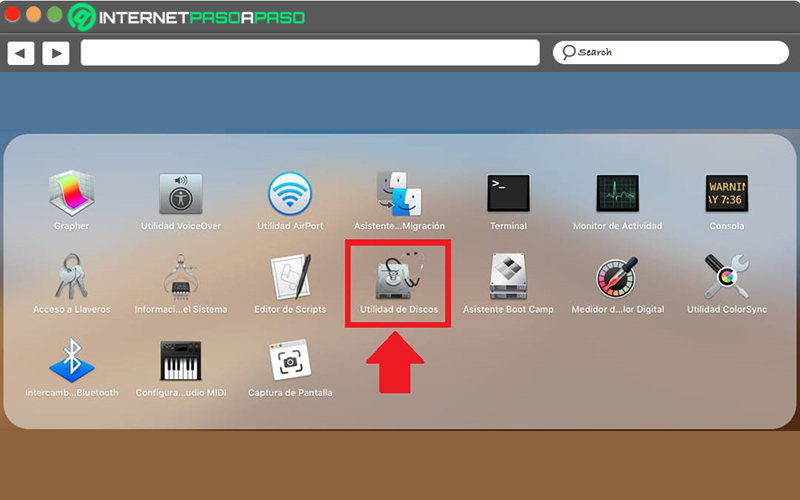
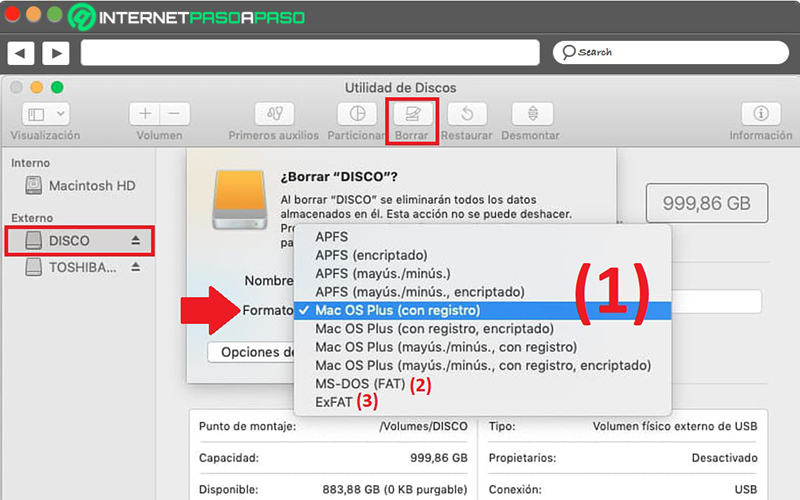
- In the Disk Utility window, go to the left hand side and through the section of External, click on the portable hard drive you want to format. done that, press the “Delete” option on top.
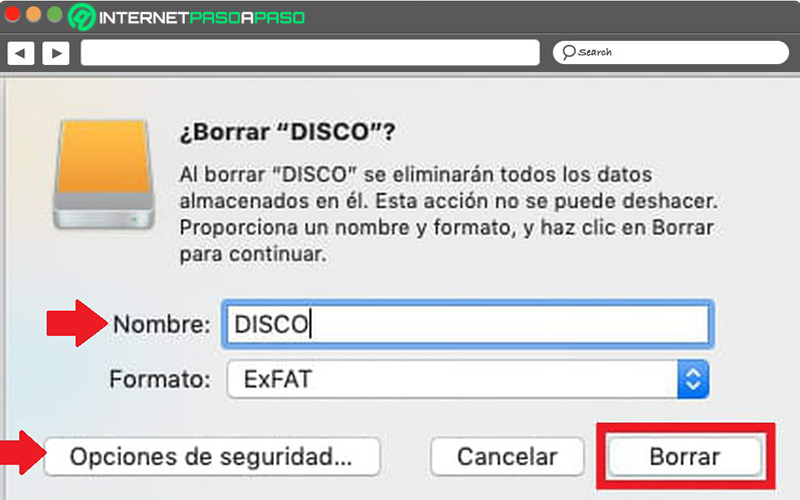
- Since DELETE DISK”?open the Format drop-down menu and choose a file system:
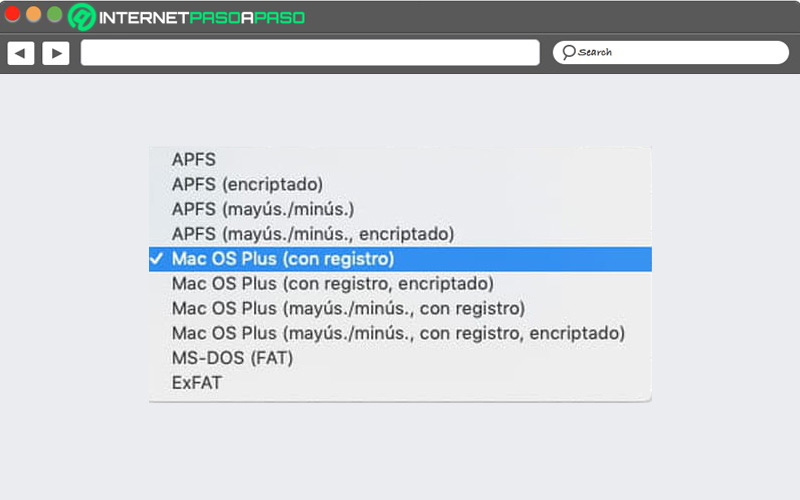
- If you want your unit only compatible with Mac computersyou must select “APFS” either “macOS Plus”.
- If you choose limit the size of your files to 4 GByou have to click on “FAT”. But, this is not the ideal format for storing an external drive.
- If you prefer that your portable drive is compatible with both MacOS and Windowswe recommend you click on “exFAT”.
- Next, the system will present you with a pop-up window in which you can change the name of the “new” external hard drive and configure other security options. After doing it, go to the bottom and click the “Delete” button to start the formatting process confirming the action with “OKAY”.
Internal Disk
In the case of the information storage device that use a magnetic recording system to permanently store data on your Mac, it can also be easily formatted. Which will increase the performance and speed of your computer, in addition to helping you free up space.
In this sense, to format this hardware element, the procedure consists of:
- Initially, if you want to keep any files from your computer that are stored on this hard drive, you have to copy it to another disk or storage devicebefore starting the process.
- Now, access the Disk Utility app on your Mac and to do so, It will depend on the type of disk or volume you want to erase:
- If you want to format your startup disk: Start your Mac using macOS Recovery and in this app, click on “Disk Utility”.
- If you need to format any other internal storage devices: Enter Disk Utility from the Dockas we explained in the previous part.
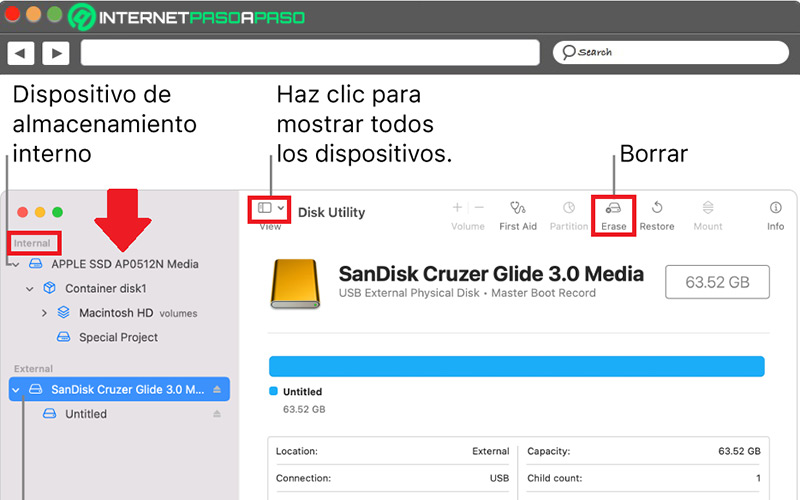
- Followed by this, choose “Display” and click “Show all devices” on top.
- Then, in the left sidebar and from the Internal section, you have to click on the storage device you want to factory start. So, go to the top and press the button “Erase”.
- Then, open the Scheme dropdown menu and click on “Partition Map”. If this menu does not appear, it is likely that you have not correctly selected the storage device to erase.
- Then it’s time to click on Format and once you see said drop-down menu, proceed to choose a file system format (Keep in mind what we explained earlier about it).
- At this point, you will be shown a pop-up where you have to enter a name to identify the formatted hard drive. Also, by clicking on “Security options”you can select how many times you want to overwrite the deleted data optionally.
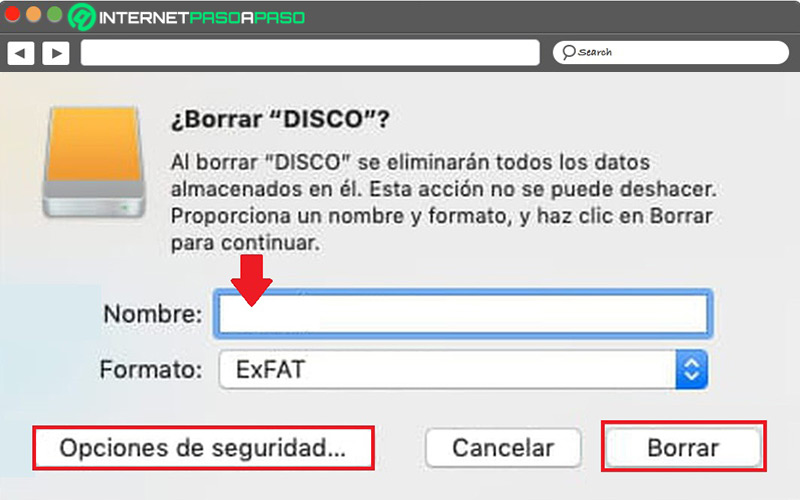
- Finally, it only remains click the “Delete” button and confirm the action by pressing on “OKAY”.
Solutions to the most common problems when formatting a hard drive in MacOS
After format the hard drive and reinstall the system operativecertain problems may still occur.
Next, we highlight which are the most common in MacOS and how they should be solved:
malware or virus
After ofdetect the presence of malware or viruses on a computer, users choose to format the hard drive to remove this infection. But unfortunately, in many cases the typical formatting not able to kill himsince it is a more powerful malware than usual.
When this happens, the solution is to run a “low level format” that it is a deep format capable of deleting absolutely everything on the hard drive, that is, permanently. So, it does not allow to restore any data. To carry out a deep format, there are several softwares and one of the best is called “HDD Low Level Format Tool” that allows you to complete it in a few steps and with ease.
Here, the step by step to follow:
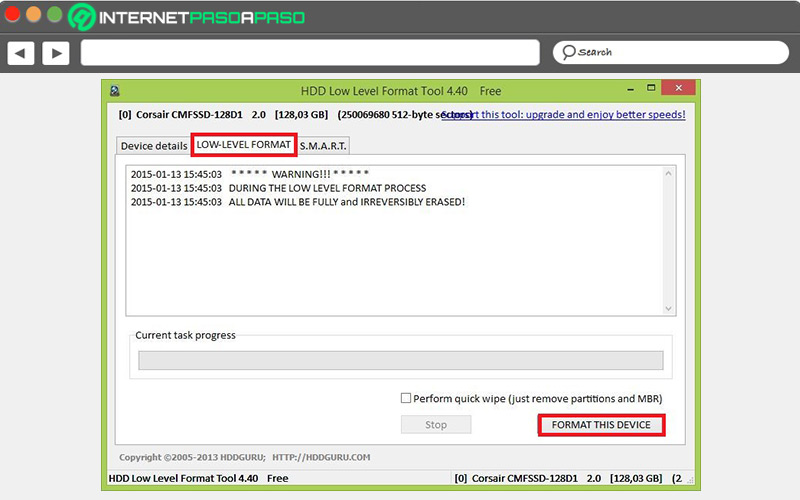
- Download and install this program on your Mac.
- After, select the hard drive to format in the list of storage devices.
- Now click on the box “Low level formatting” on top.
- Then press the button “Format this device”.
- Finally, the formatting process will start and it only remains to wait with the computer on.
Missing or corrupt DLL, SYS, or EXE files
For nature, DLL, EXE, or SYS files missing, damaged or corrupted generate errors during the startup phase of the operating system or of a certain software. Which can sometimes occur after formatting a hard drive in MacOS. In order to fix this, IT professionals take it upon themselves to replace the applicable version of the EXE file.
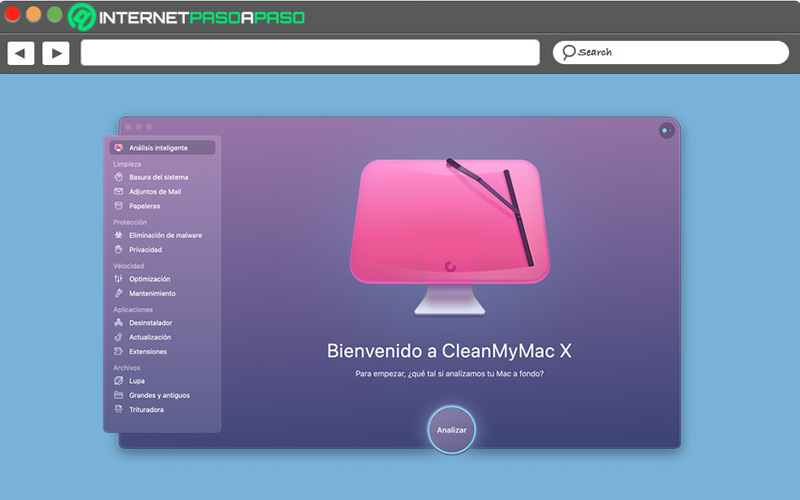
However, the same users can take the measure of use a registry cleaner in order to repair whatever file extension is causing the error. One of the recommended utilities for this on Mac computers is known as “Clean My Mac X” because it has the best cleaning and removal functions. Thus, it takes care of scanning the corners of your computer in search of useless, damaged or corrupt files to delete what doesn’t work for you.
Apart from its cleaning management, this software scans for and detects malware or malicious softwareat the same time it manages to speed up Mac performance. Therefore, you can install and run it after formatting the hard drive to remove damaged DLL, SYS or EXE files.
Incorrect format
This is an error that, many times, may occur during or after the hard drive formatting process and prevents its normal operation. Consequently, it is impossible to access the stored information, thus generating data corruption. In addition, it also tends to occur when trying to copy or enter some information that the operating system suddenly closes. Once this happens, it is suggested that the user use the Disk Utility tool.
After entering this application, the step by step is:
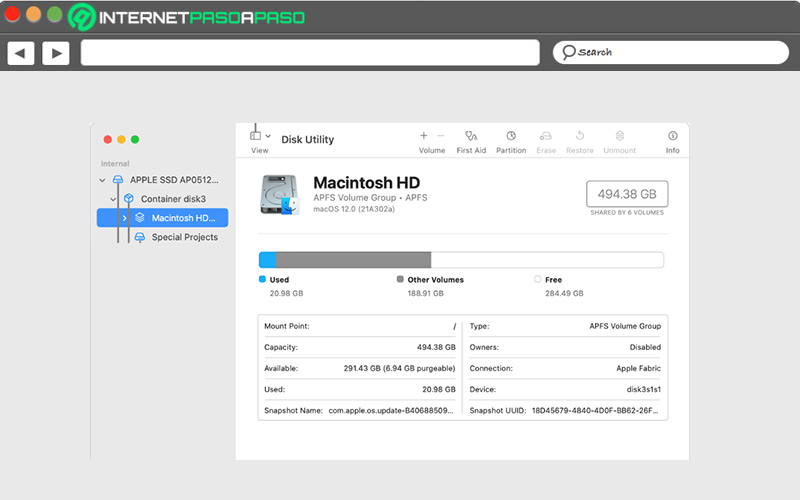
- Choose “Display” and click on “Show all teams”.
- Select a volume in the left sidebar and click on “First aid”.
- In the next dialog, press “Run” and follow all the instructions that are displayed on the screen.
- Once the process is complete, you have to press on “OKAY”.
This procedure must be carried out with each volume, each container and each storage device. So, if the Disk Utility app indicates that the disk was repairedit means that the error has already been fixed.
Corrupted hard drive partition
If after formatting the disk it is found that a partition or section of the disk is damaged, one of the most useful methods to solve it is starting Internet recovery mode or “Internet Recovery”. Well, it allows you to install the latest version of MacOS on your computer when its partition got corrupted or deleted.
Now, to enter the Internet recovery mode, these are the steps to execute:
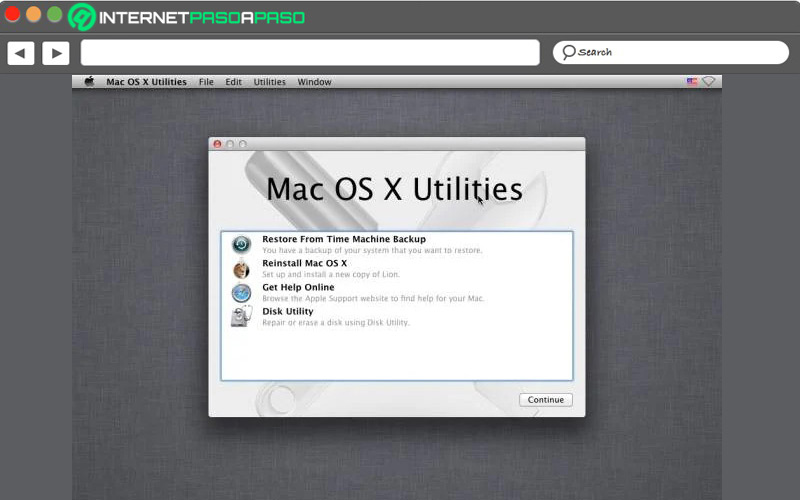
- Restart your computer and when you hear the startup sound, hold down the keys “Command + Option + R”until you see the animated globe on the screen and get a message that says “Starting Internet Recovery”.
- Then click on “Choose network” and choose one on the next screen to connect. Since, Internet Recovery needs a WiFi connection to be able to download the recovery tools.
- After connecting to a Wi-Fi network, the system will download a recovery system image from Apple servers to access those tools. This may take a while, depending on the quality of the WiFi.
- Later, you will be presented the MacOS Utilities window and among the available options, you have to select the one you need. For example, reinstalling a fresh copy of the version of MacOS that was preloaded from the factory.
Operating systems