Social media and email services they are widely used means currently to maintain communications with our work teams and loved ones, and in both cases, it is important to know how to identify ourselves from other contacts.
In the particular case of Outlook, this is achieved through customizations such as the profile photo, through which we will allow our contacts identify our Outlook profile at a glance.
Next, We will teach you step by step what you need to know about this simple but essential customization, from how to size and change it on all platforms, to different actions you can take to leave your account as you want it to look.
What are the dimensions of a profile photo in Outlook?
The Outlook display settings allows users to view a profile photo of their contacts in a circular format. For this reason, the photo is cropped to fit the frame provided by Outlook.
As for the image itself, it has some requirements for it to be eligible as a profile photo. To get started, its size must be less than 4MB and it must be an image file of format JPG, PNG or GIF. Besides this the image you want to use It must be saved in the internal storage of the device you are using, so using an image saved in OneDrive will not be possible.
Learn how to change the profile photo of your Outlook account
The Outlook email service It has a series of very interesting customization facilities that allow you to customize the appearance of your inbox. One of the most basic, and yet essential, is the modification of the profile photo, which we can do from the web application of Outlook on all our devices, regardless of their operating system.
Go for it:
From the computer
The easiest way to power making customizations in your Outlook account is through the web application, from where we will have access to the profile photo settings.
To modify this setting, we just have to follow these steps:
- Log in on the website of Outlook.
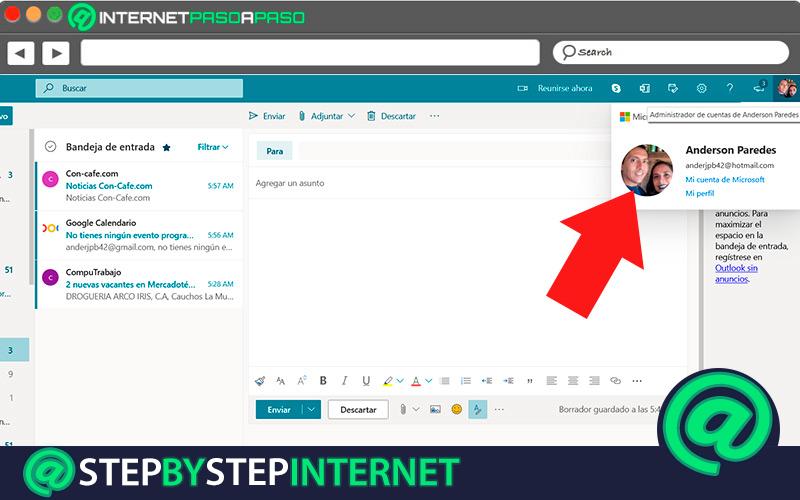
- Select the circle with the initials of your name, which you will see in the upper right corner of the window.
- click in “My profile”.

- Choose the box “Add a photo.”
- In the window that will pop up, click on the link “Add a photo.” This will open the file explorer.
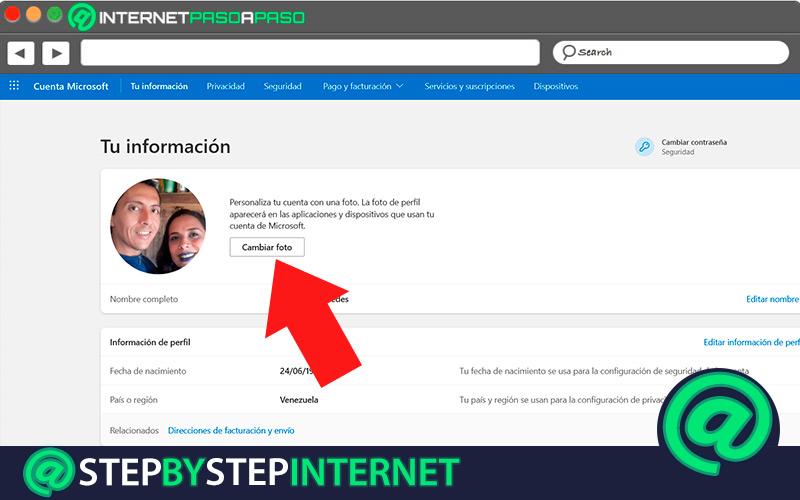
- Choose an image from among the files on your computer and adjust it to match the circular frame of the Outlook.
- click in “Keep”.
From the phone
While it is possible to configure the profile photo from the mobile phone, The first thing we have to know is that it will not be from the application. This is because the mobile app of Outlook it concentrates all the functions to improve the mail service, but invests very little in customization settings.
However, to carry out this process, it is necessary to enter the Outlook web application from the mobile browser, and follow the steps described below:
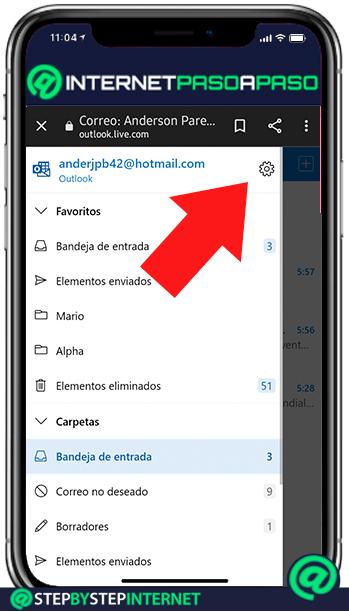
- Press about him three horizontal lines icon, located in the upper left corner.

- Select gear that you will see next to your email account.
- In section “General” enter the option “Bill”.
- Choose the option “See account”.
- Press the box “Add a photo”.

- In the window that will open, click the link “Add a photo.”
- Choose the image from the reel of photographs that you will see below, and click on “Ready”.
- Adjust the image to fit the Outlook frame, then press “Keep”.
To the set up the profile picture in your Outlook account, this will be updated automatically in the mail client of all your platforms, so you will only have to make this adjustment once.
Other actions you can take to customize your Outlook profile
Our Outlook profile it is a very personal space in our mailbox, so we have several options to configure a view adapted to our tastes and needs. Within the settings of Outlook, both in its web version and in the mobile application, we can find certain customization features that will allow us to give a unique touch to our inbox.
Let’s see next:
Rename
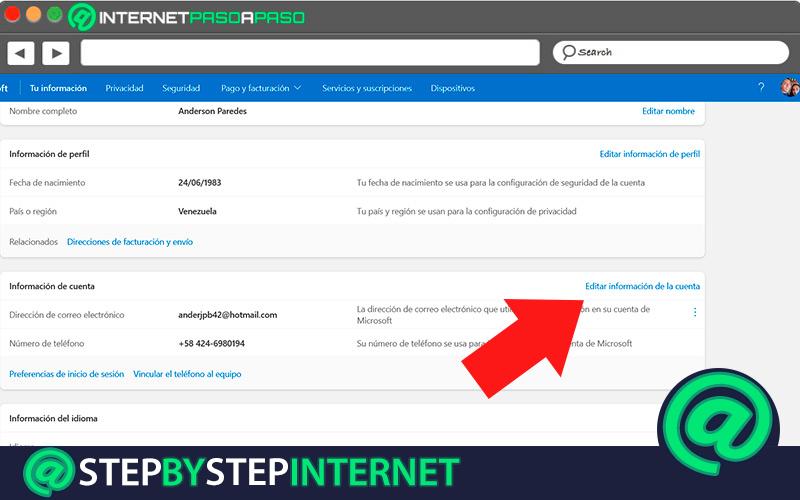
Modify your Outlook username is a function that will allow users who have you added to their contact list from Outlook find you more easily. The procedure to change the username can only be done from the web application, although it is possible to access it both on the mobile phone and on the computer.
To begin, the steps on the computer are as follows:
- Log in on the website of Outlook.
- Select your profile picture and enter the option “My profile” in the drop-down menu.
- Click on “Edit name” in the section that you will see under the profile image, which will be labeled as “Name”.
- Modify the first and last name depending on how you want them to appear in Outlook.
- Perform the verification via Captcha if requested.
- Press in “Keep”.
Although to make this adjustment on the mobile it is necessary to enter through the browser, the steps are slightly different, since the mobile app has a slightly different layout.
The steps are outlined below:
- Enter the Outlook web client through your mobile browser.
- Press the three horizontal bars located in the upper left corner.
- Select the gear icon that you will see next to your email.
- In section “General”, select the option “Bill”.

- Login in “See account”.
- Enter the link “Edit name”.
- Edit the first and last name according to your preference.
- Solve the Captcha that is presented to you.
- Press “Keep”.
Configure interface appearance
Configure the interface is one of the few aspects of customizing Outlook that can be managed both from the website and the mobile application. However, even so, the scope of customization is much greater from the web portal.
Performing this type of adjustment from the mobile application requires the steps described below:
- Start the Outlook application on your mobile.
- Choose your profile picture.
- Click on the gear icon to access the settings.
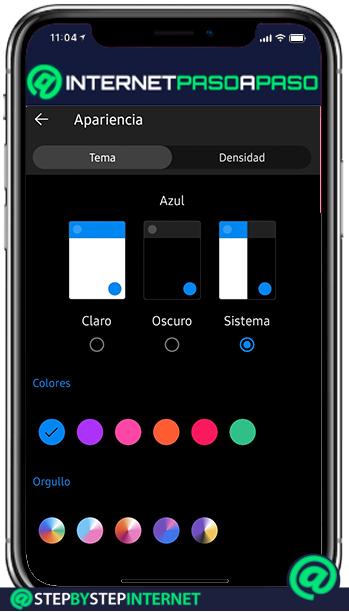
- Scroll down until you see the section “Preferences”.
- Enter the option “Appearance”.
- Select a color theme among those available to apply to the inbox.
- Select your preference between the light or dark theme settings.
The procedure through the Outlook web portal consists of the following steps:
- click on the icon gear, located at the top of the window.
- Login to “See all Outlook settings.”
- Follow the path “General> Appearance”.
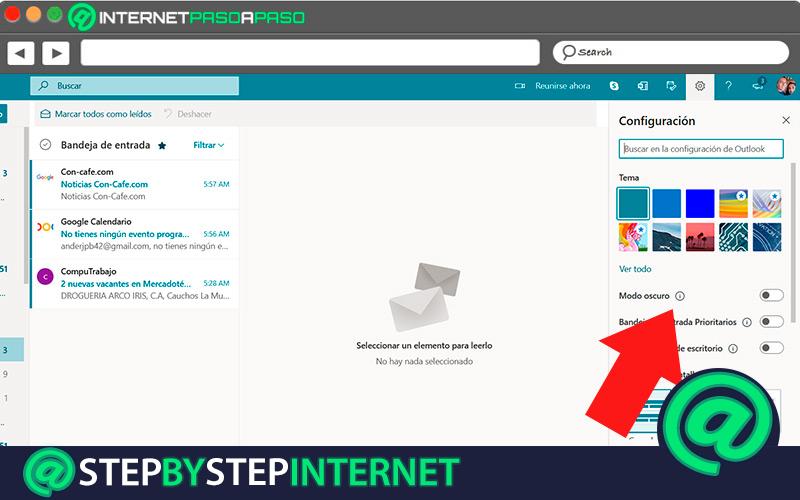
- Define the color palette and the theme you want to apply to your inbox
- Activate dark mode for your inbox if you wish.
- click in “Keep”.