The indexes help us a lot in those moments in which time is scarce and obtaining information from a document must be precise. These are nothing more than a structure that helps us organize different sections of a document whether sectors, references, among other things, to access it quickly and easily .
It is very simple when the document has little information, but when we talk about textbooks, theses or even works that gather a lot of information, looking for an exact section can become a tedious task. In addition, the annex of an index to our document gives a touch of professionalism and elegance quite important at the time of being read , getting more confidence in the information within it.
In this tutorial you will learn to make a quality index or table of contents automatically or manually by your own means with a professional appearance, taking into account the factors that affect him. We will guide you step by step, so that it is easy for you to continue with the tutorial and do not miss anything.
Index:
Steps to index in Word automatically
In this case, we will show you how to make an Index that is written and created automatically in your document as you create the titles. However, there are some specific factors that must be followed To perform this method:
- Have the activated version of Microsoft Word since the option is not available in the free version .
- The indicated format should be used without any variation as this is what will cause the index to be generated as we update it, using the options required for our titles and subtitles that will form the table of contents and sub- indexes.
- It is recommended to leave a blank sheet at the beginning of the document in which our index will be generated. For this way to save time and avoid possible errors or damage in writing.
Once you know all this it is time to go into the subject and indicate the steps to follow to create your own table of contents automatically .
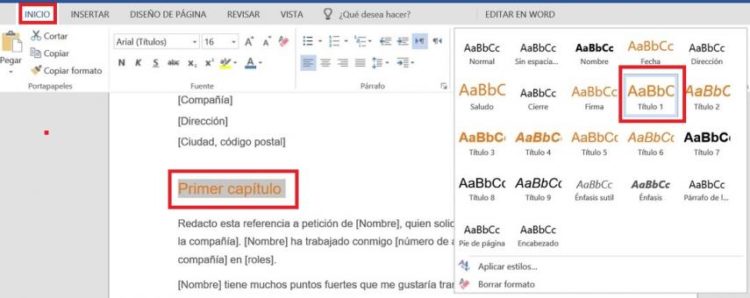
- The first step is to highlight the titles and subtitles that will be placed in our index and that are found throughout the entire document. To do this we will add a style between the default Microsoft Word styles, thus ensuring and telling the program what the indexes and sub-indexes to be generated will be.

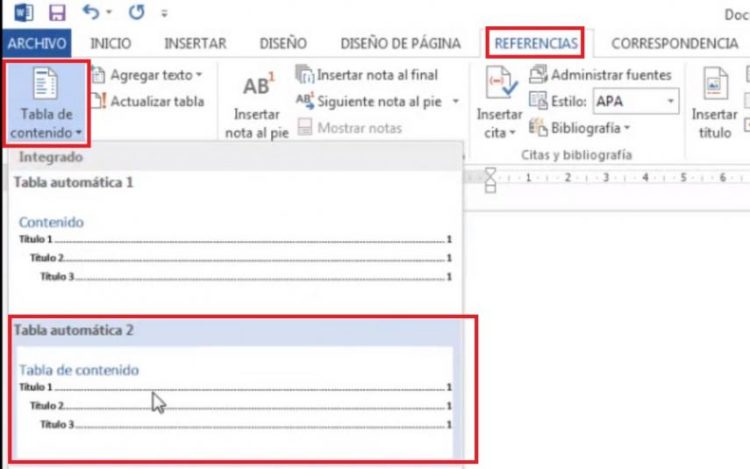
- Once the titling and style annexing process is finished, go to the blank page where the index will go and place the cursor on it. At the top of the text document, go to the “References” tab. On the left you will find an option called, “Table of contents”, access that option .

- Select the second option that says “Automatic table of contents 2” and shows a brief example of it. And so as easy as a couple of clicks your table of contents has been created with all the indexes and sub-indexes that you have previously marked.
We have already created the index . However, if we want to edit or add more indexes and sub indexes, all we have to do is select and apply the styles to the texts we want to add to the index. We go to the table of contents (Index) , and select everything, right click on it and a drop-down menu will appear.
We look for the option “Update the whole table”, we mark it and we accept it, and this way the table of contents will be updated with the new titles that we add.

If on the contrary we want to remove, we should only, instead of placing the styles, remove them by selecting in the appropriate options bar by default. After that, do exactly the same, and so the unwanted title will be removed.
How to create a table of contents in Microsoft Word manually?
To create a manual table of contents we will use the rule function of our Microsoft Word. Follow the steps properly to avoid making mistakes.
- We will place ourselves in the higher rule of measures. If by chance this does not appear in your Word window, it is easy to solve it. Go to the tabs above the one that says “View”. At the center in the “Show” section you will see several options including “Rule”, check the box and they will appear on the screen.
- Well, once located in the Ruler tool, we are ready to move the cursor on it. We will create a tabulation point , this point will be where the numbers of pages belonging to our sections of documents will be, to guide you we have as reference the 14 centimeters and its vicinity, doing it with the right click.
- Once located there, we double-right click on the same point to bring up the Tabs menu .

- Once these options are chosen, we proceed to create the table of contents manually. Write us placing the name of our chapter or entry on the configured page and after that we press the TAB key. Immediately the fill characters will appear, and we place the number of pages on which it is located.

Repeat this step as many times as necessary, by pressing the «Enter» key at the end to jump to the next line where we will enter the entry and we will create our index manually.
How to create subscripts in Microsoft Word and format the titles?
We already know how to create the Indexes or tables of contents, in the two possible ways, manual and automatic. Now, however, it is time to shore up a couple things; format the titles with the correct styles and create subscripts in our table of contents, both manually and automatically.
As we put in previous moments to create a table of contents requires the assignment of styles to various titles and subtitles that will become the indexes and sub-indices of our table . Now we will explain step by step how these formats are created and added, to generate the sub indexes automatically.
To start, we have our default table that we have generated with each of the titles we already created. To add the specific title style, we must do the following:

- First we select the text fragment that we are going to apply the format , we go to the «Start» tab in the upper right where it puts styles , and we click on the double arrows pointing down to display all the formats. We look for the one that puts “Title 1”, for the Indices, and “Title 2” for the sub-indices. strong> We click on the style we want and it is applied correctly.
- We have already applied the proper style, it is time to make our new index and sub-index appear in the table of contents we create To do this, we go to the table of contents that we have there and click inside its content.
- Clicking will create a frame and at the top of it will put “Update Table”, we click there and a pop-up window will appear, with the update options.
- We choose the option that says “ Update the whole table ”, and we accept it, then it will load us to the contents of our table the indexes and subscripts we have added.