Although it is not very demanded to make indexes in this office program, if you can learn to do them, since it helps you to better organize the information that contains your presentations, and in this way you can also quickly locate the information that there is throughout the document .
Although you have to know that the application of Power Point does not have the tools to generate indexes unlike Microsoft Word , since the main objective of this is to make presentations in professional or simple ways . However it is possible to make a table of contents with some tricks that we leave later.
We explain how to make an index in a practical way , without having to roll up a lot. This is possible to join functions and tools to do so, one of the tools to generate them, are hyperlinks. Do not anticipate more read on, it will not take you more than an hour to index your presentation, and make it look totally professional.
Index:
Steps to make an index in Power Point 2013 or 2016
Next we’ll show you two ways to create an index in Power point in a very easy way. You just have to follow this guide correctly so you can do when you want an index on your presentations.
Generate index automatically
Let’s start with the automatic way that is the easiest to apply since almost everything the program does. The steps to follow are as follows:
- First copy the slide titles, being in “Outline View”.

- Then in the thumbnail panel, select «Collapse» and click on «Collapse All».
- You will do click and drag to select all the titles that exist in the presentation you want to insert, and click “Copy” or the key combination Ctrl + C .
- Now change the text box of the slide (table of contents), and in the start menu select paste, in the list that is displayed select “Paste special”.
- Then you will see a box to select formatted text (RTF) or plain text , and click Accept. You can change the style of your frame as you wish .

Now it’s time to create hyperlinks in the table of contents . This is done when you have already made the titles and ordered in the table of contents.
- You are going to select one of the titles that is in the table of contents.
- In the “Insert” menu, Find and select the “Links” option. In the options that will be displayed, click on insert hyperlink, and select the place tab of this document.
- In that box, select the slide that corresponds to the chosen title and click “Accept” to insert the hyperlink of the table of contents (index) slide.
You will repeat these steps, for each of the titles. And in this way you already have your index with hyperlinks or links within the same document .
Create table of contents manually
Now is the time to go old. Pay attention so that you learn to create your table of contents manually in Power Point by following the steps below:
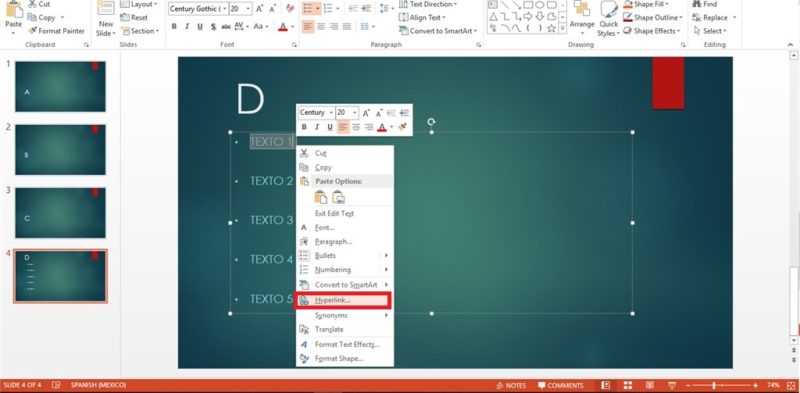
- First generate a bulleted content list on the slide you are going to name as an index.
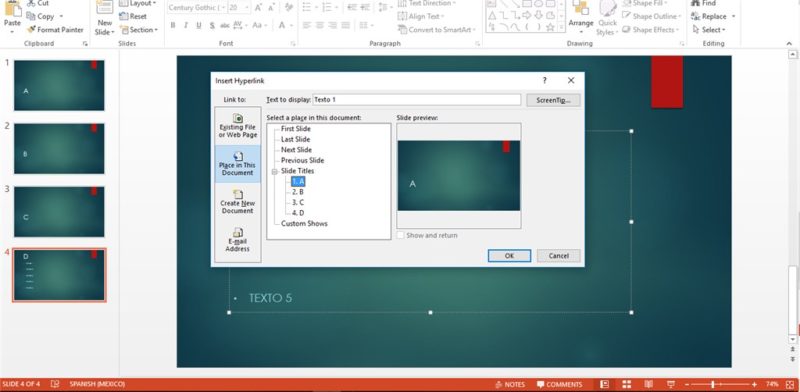
- Now select the first bullet option and secondary click and select the favored Hyperlink option.

- A window will open in which you can find a panel located on the left side. Search and select the section located in this document. And you will find the slides you already generated, only you must select the one you want to be open , when you click on the bullet.

When you have completed this process, click on the bullet, and you will see that it will redirect you to the device you set up. This way you can always do the index manually .