Currently, for any user, whether a university student, professional or housewife, it is important to use certain tools that Microsoft Word brings, which make your life easier when you make a document. One of these are the indexes, which are ideal for displaying in an orderly and logical way the content of the work, providing elegance and professionalism very pleasant to the eye.
Word is a powerful word processor of the Microsoft Office Suite , it is a program that allows you to do many things and among them a table of contents, commonly called index, which is very useful to obtain the organization of the document, or for the user to have a reference when accessing the information, since you can visualize the structure of the text by chapters, title and subtitles and that definitely helps the reader.
In this sense, in this tutorial, we will teach you how to create an index in Microsoft 2007 and 2010 through very explicit, simple and practical illustrations, so that from the moment you prepare the Table of contents of any document, whether as a thesis, university papers or organization manuals. The novelty of this guide is that you will learn to do it both ways: the manual and the automatic.
Index:
Steps to index Microsoft Word 2007 and 2010
Text tables can be generated in two ways and you’ll learn how to do it both ways in this tutorial. It is an extremely simple process that you can even do without much knowledge thanks to the intuitive software interface. But to make things even easier for you, we tell you step by step how to do each of them.
Generate index automatically
The advantage of doing so with Microsoft Word is that once the index is created, if we add more content to the document, the index will be updated directly .
- Create an index or table of contents in Word, for that you must set the title, subtitles and any division in the text , for this tutorial we elaborate an example text with a title and three subtitles.
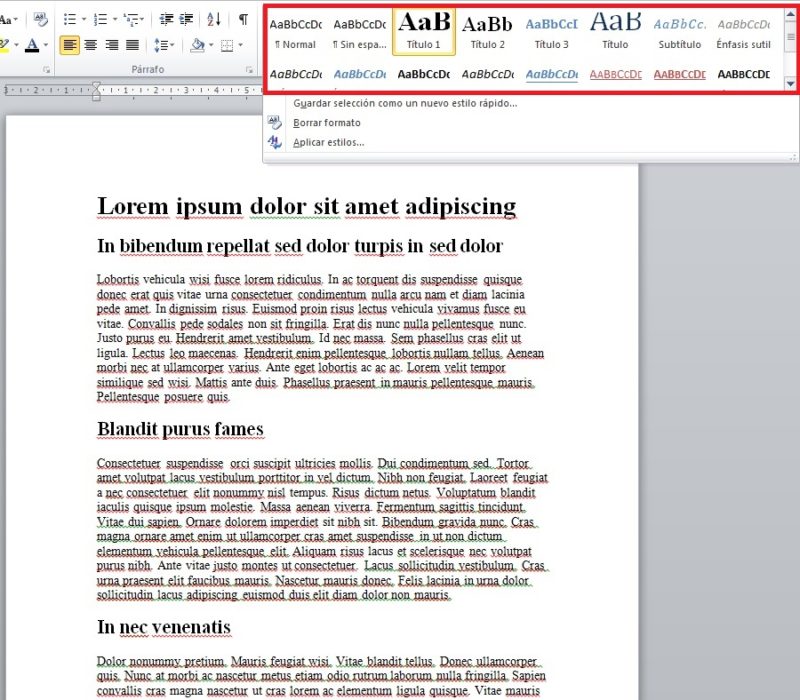
- Here you have to select the titles in order of importance, for example you must click on which one will do the Title I, Title II and so on. You do that in the titles section .

- If you don’t like the font options with which your titles have been changed after assigning them a Heading (header) format, you can change them by shading the text and clicking with the right-click on the mouse and select representedModify important.
- Then a new window will appear, and this is where you choose the style you like best.
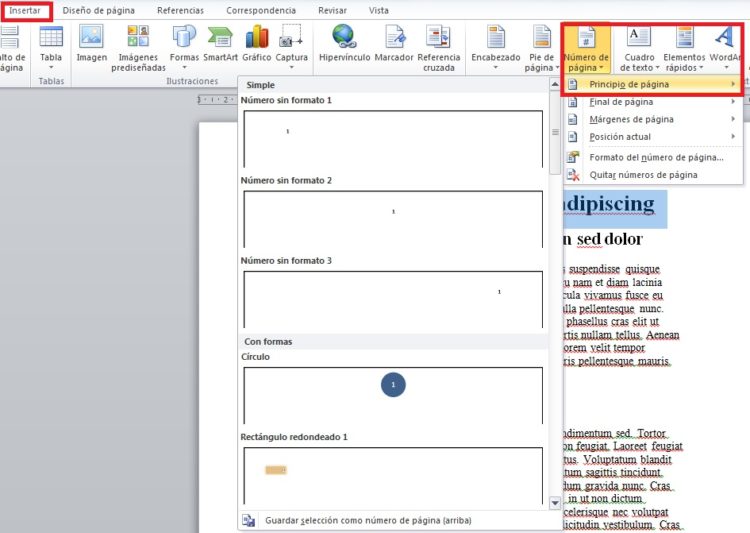
- Insert page numbering. You are located in the “insert” menu , then look for the option “Page number” and choose the one that best suits your needs.

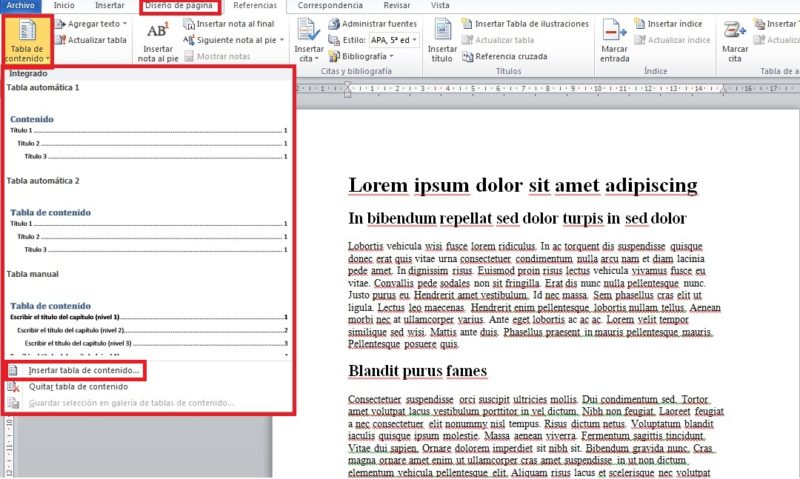
- Then it directs you to the menu « page layout» , there it locates on the left side the «table of contents» and chooses the design that more please and finally click on insert table of contents.

- Then a new window appears with the preliminary view of the table and then click on Accept. The result will be the index with its respective perfectly generated numbering.
Create table of contents manually
This is another way of doing the index. For this you must configure the tab points in the rule when the document is opened.
- If by chance you don’t see the horizontal ruler, scroll to the “View” tab and check the “ Ruler ” box.

- Once you see the horizontal ruler, create a tab point by clicking on the position that the page numbers of the sections of your content index will occupy (it is 14 cm long) Then, double-click on that tabulation point so that the Tables.
window is displayed
- Check that the alignment is to the right and then select the fill characters that the word processor will expose between each entry and the page number. Click Accept to return to your document.
- Then, type the name of your first entry (for example, here I used Introduction) and press the TAB key Then, type the page number and touch the Enter key. You will repeat this step for each new entry you want to make (for the tutorial place, Background, Objectives and structure).
- Done, you have the option manual to do the content index , I hope you found the information useful.