Windows 10 has many improvements that have placed it as one of the most recommended and extended operating systems globally. Home users, or at least the vast majority, have this operating system on their computers and even tablets for the performance it offers, for the functions it offers and the wide range of compatibility it has, in fact it is mandatory for those have computer equipment with very high performance.
Among the most outstanding features it has is Microsoft OneDrive ![]() , a tool that performs the same function as others also known as Google Drive . It is a program that is currently installed on all PCs that use W10 and allows its users to store all the information they want in the cloud, or what is the same, on the internet. In addition, it also allows you to share files with other users through links or make backup copies automatically thanks to the permanent synchronization it offers.
, a tool that performs the same function as others also known as Google Drive . It is a program that is currently installed on all PCs that use W10 and allows its users to store all the information they want in the cloud, or what is the same, on the internet. In addition, it also allows you to share files with other users through links or make backup copies automatically thanks to the permanent synchronization it offers.
All these tasks are carried out by very simple actions, since Onedrive ![]() from Microsoft is committed to an easy to understand interface. However, in this small guide we will explain the steps to follow in the most common issues, such as how to update the OneDrive application
from Microsoft is committed to an easy to understand interface. However, in this small guide we will explain the steps to follow in the most common issues, such as how to update the OneDrive application ![]() in Windows 10 .
in Windows 10 .
Index:
How to synchronize Onedrive in Windows 10 step by step?
This is a not too complicated procedure, which we also explain together with others such as the activation of synchronization, the fix of the most frequent errors that usually appear with its use or the search of the versions most recent of this software.
Synchronize Onedrive ![]() in Windows 10 is quite easy . Luckily, this software to store files in the cloud is something that is installed as standard on each computer that has this operating system and its use is very intuitive. We will explain how to work with the Microsoft cloud step by step so you can get the most out of it.
in Windows 10 is quite easy . Luckily, this software to store files in the cloud is something that is installed as standard on each computer that has this operating system and its use is very intuitive. We will explain how to work with the Microsoft cloud step by step so you can get the most out of it.

We will start from the beginning, having to synchronize your Microsoft account from scratch:
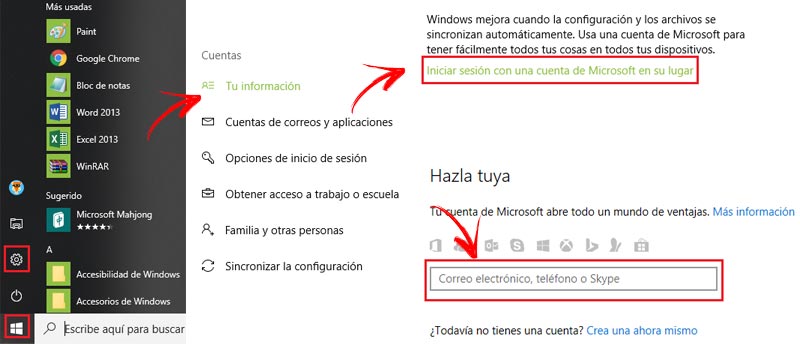
- Click on the Windows button of the start bar and, there, look for the icon with the cogwheel . It’s the “ Settings ” menu.
- Click on the icon where « Accounts » appears , and then in the “ Your information ” section, click “Sign in with a Microsoft account instead” .
- Enter your account’s email in the field that appears in the new window and click on “ Next ”.
- Do the same with the access password.
- Now enter the password to access Windows . If there isn’t, leave the field empty and click on “ Next ”.
- Now enter the PIN code to log in to your PC or use “ Windows Hello ”.
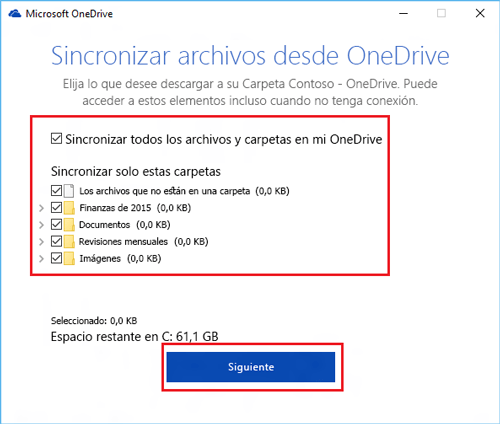
With the session started , the following is to start synchronize files with Onedrive ![]() to save them in the cloud. The procedure, as you can see now, is still very simple and quite fast:
to save them in the cloud. The procedure, as you can see now, is still very simple and quite fast:
- Enter the “File Explorer” , icon with a yellow folder on the bottom bar of the desktop.
- Choose any file or folder on your hard drive and click with the right button . In the drop-down menu, click on “ Copy ”.
- Now, look for “OneDrive” on the left side of this window and enter it.
- In the list of files that appears on the right, right-click on a free space and click “ Paste “. The selected files will be uploaded directly to the cloud. Done !.
Why does OneDrive not synchronize automatically? Here the solution

There may be several problems when OneDrive ![]() perform automatic synchronization To know what happens, you have to lower the mouse to the bottom right of the screen and, if you do not see the symbol of this tool, click on the arrow to show the hidden icons.
perform automatic synchronization To know what happens, you have to lower the mouse to the bottom right of the screen and, if you do not see the symbol of this tool, click on the arrow to show the hidden icons.
- If the Onedrive logo appears with a red circle and a white cross
 , click on it and on” See synchronization problems “.
 - In the window that appears you will see a description of the problem and the solution with which to allow everything to start synchronizing as it should. Click on “ Close ” and follow the instructions given to you.
This icon may not appear, but there are still connection and synchronization problems . In that case, you should see the following possible solutions:
Because you don’t have internet access
- Click the right mouse button and open the drop-down menu .
- Click on “View online” .
- If it fails, make sure that the internet connection symbol is fine (if it is Wi-Fi , it appears with the coverage lines ).
- Restart your connection to the network and try again.
Because you have not started OneDrive
- Press the Start button in Windows 10.
- In the search bar, type “OneDrive” .
- Click on the application that appears as a result.
Because you have paused synchronization
- Right-click on the OneDrive icon in the lower right.
- Click “Resume sync” .
Because the files are not compatible
Some of the files to be synchronized may not be compatible with the platform, make sure they meet the following requirements:
- File size less than 15 GB .
- Full path with less than 400 characters . Ex: “ C: Users Test Images 2018 Christmas Dinner… ”
- The file name does not contain any characters that are not allowed ( ,;,?, *, /, , |, “Or:).
Download and install latest version of OneDrive for Windows
Windows 10 performs automatic updates that ensure that OneDrive ![]() always be in the latest version possible . However, you may have blocked these downloads to avoid reboots and the long waiting periods that your installations usually require.
always be in the latest version possible . However, you may have blocked these downloads to avoid reboots and the long waiting periods that your installations usually require.
If you want to download and install the latest version of OneDrive ![]() to Windows individually, without automatic downloads of the operating system, do the following:
to Windows individually, without automatic downloads of the operating system, do the following:
Download OneDrive Latest Version
- First we must download the program in its latest version, for this follow the links that we provide, they are 100% safe.
- When the file download ends OneDriveSetup.exe , go to the “ Downloads ” folder on your PC using the “ File Explorer ” and double click on it.
- The installation begins without you having to do anything.
- Go to the “ Start ” button in the lower left and look for the Onedrive application in the search engine.
- Click on the program that appears and now enter your data in the popup window . You just have to enter your email address and click on “ Login ”. If they ask for your password, also type in your Microsoft account .
In order not to have to search again and again for the newest version, you can request that Windows 10 automatically updates it and, thus, always have the OneDrive ![]() newer on your PC. To do this, do this:
newer on your PC. To do this, do this:

- Go to the Start menu and search “Microsoft Store”
 . Click on the first result to enter the store.
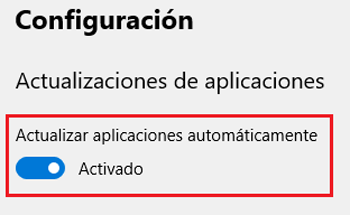
 - Go to the top of the store and click on the icon with the three horizontal dots . In the drop-down menu, click on “Settings”.
- Look for the “ Application updates ” section and then leave the option “Update applications automatically” .
This way, Windows 10 will keep Onedrive up to date ![]() on your computer and other Microsoft applications.
on your computer and other Microsoft applications.